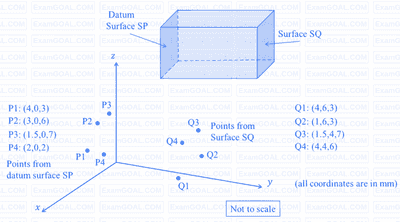
A coordinate measuring machine (CMM) is used to determine the distance between Surface SP and Surface SQ of an approximately cuboidal shaped part. Surface SP is declared as the datum as per the engineering drawing used for manufacturing this part. The CMM is used to measure four points P1, P2, P3, P4 on Surface SP, and four points Q1, Q2, Q3, Q4 on Surface SQ as shown. A regression procedure is used to fit the necessary planes.
The distance between the two fitted planes is ___________ mm.
(Answer in integer)

An optical flat is used to measure the height difference between a reference slip gauge A and a slip gauge B. Upon viewing via the optical flat using a monochromatic light of wavelength 0.5 µm, 12 fringes were observed over a length of 15 mm of gauge B. If the gauges are placed 45 mm apart, the height difference of the gauges is ______________ μm.
(Answer in integer)

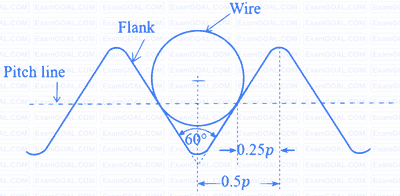
The best size wire is fitted in a groove of a metric screw such that the wire touches the flanks of the thread on the pitch line as shown in the figure. The pitch (p) and included angle of the thread are 4 mm and 60°, respectively. The diameter of the best size wire is _________ mm (round off to 2 decimal places).

$${2.0^{ \pm 0.005}}\,\,mm$$. Neglecting the gauge tolerance, the diameter (in $$mm,$$ up to $$3$$ decimal points accuracy) of the $$GO$$ ring gauge to inspect the plated pin is ___________