A part, produced in high volumes, is dimensioned as shown. The machining process making this part is known to be statistically in control based on sampling data. The sampling data shows that D1 follows a normal distribution with a mean of 20 mm and a standard deviation of 0.3 mm, while D2 follows a normal distribution with a mean of 35 mm and a standard deviation of 0.4 mm. An inspection of dimension C is carried out in a sufficiently large number of parts.
To be considered under six-sigma process control, the upper limit of dimension C should be ____________ mm.
(Rounded off to one decimal place)

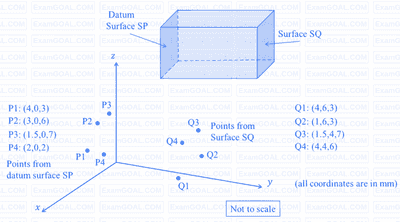
A coordinate measuring machine (CMM) is used to determine the distance between Surface SP and Surface SQ of an approximately cuboidal shaped part. Surface SP is declared as the datum as per the engineering drawing used for manufacturing this part. The CMM is used to measure four points P1, P2, P3, P4 on Surface SP, and four points Q1, Q2, Q3, Q4 on Surface SQ as shown. A regression procedure is used to fit the necessary planes.
The distance between the two fitted planes is ___________ mm.
(Answer in integer)

An optical flat is used to measure the height difference between a reference slip gauge A and a slip gauge B. Upon viewing via the optical flat using a monochromatic light of wavelength 0.5 µm, 12 fringes were observed over a length of 15 mm of gauge B. If the gauges are placed 45 mm apart, the height difference of the gauges is ______________ μm.
(Answer in integer)

The effective stiffness of a cantilever beam of length L and flexural rigidity EI subjected to a transverse tip load W is
